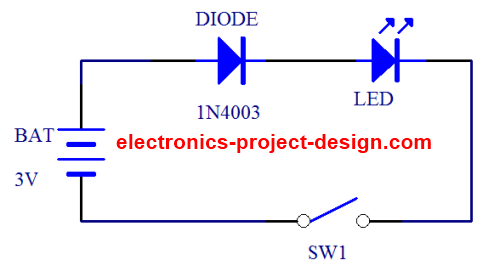
LED Circuit Design for penlight or keychain Circuit Diagram
LED Circuit Design for penlight or keychain Circuit Diagram The LED has a voltage drop, of around 2 volts. And so our resistor needs to remove the remaining voltage. So, 3Volts minus 2Volts = 1Volt. We know the LED needs a current of around 20milliamps so 1 volt divided by 0.02amps equals 50 Ohms of resistance. A simple LED circuit diagram is a basic circuit that can be used to power and control an LED. The circuit consists of a few key components: a power source, usually a battery or power supply, a resistor to limit the current flowing through the LED, and the LED itself. This is the source of electrical energy that powers the LED circuit. The
simple circuit light bulb with switchsimple circuit light bulb with switch and resistor simple circuit diagramsimple led circuit diagram simple electric circ Components Required for a Simple LED Circuit Diagram. In order to create a simple LED circuit diagram, there are a few basic components that are required. These components work together to allow the flow of electricity and to control the brightness of the LED. Here are the main components needed: 1. LED (Light Emitting Diode) Ever wondered how tiny LEDs light up your favorite gadgets? Learning how to build a basic LED circuit is the perfect way to start exploring electronics!Table of Contents1. What is an LED Circuit?2. Understanding Polarity in an LED3. How to Build a Basic LED Circuit • Materials Needed • Step-by-Step Instructions4. How Does an LED Circuit Work?5. Types of LED and Their Uses6. Common Mistakes

How to design LED Circuits Circuit Diagram
Simple Basic LED Circuit. Step 1: 3 Volt Basic LED Circuit With 10 Ohms Resistor. The above diagram shows a 3V LED circuit, in this circuit there are two AA cells are used. When you are operating an LED with 3V you have to use minimum 10 ohms resistor . #led #diyelectronics #circuit 🗳️ How to Build a Simple LED Circuit Using an Arduino In this tutorial, Bryan DeLuca from Maker Build It walks you through the Here is a diagram of the basic circuit. Just as before, the LED positive side is connected to the battery's positive side, and likewise negative to negative. The current will flow from the battery through the resistor and LED and then back to the battery. The resistor and LED are connected in series, which means one after the other.
Simple 6 Watt SMPS LED Driver Circuit. The following design depicts a simple 6 watt driver example using a cheap commercial SMPS board. Simply by adding a current controller stage between the SMPS and the LEDs, we transform the SMPS circuit into a fully compatible LED driver module for the 6 watt LEDs. Parts List. T1 = TIP122. T2 = 2N2222
